Group policy precedence and inheritance in Active Directory

Applying group policies on users makes our task easier. There is the order of how these policies get applied on a user. Group policies on OU (organizational units) have more precedence than domain GPOs which have higher priority than site GPOs and Local GPOs.Policies are applied in

Policies are applied in following order:

  1.   Local GPOs
  2.   Site GPOs
  3.   Domain GPOs
  4.   OU GPOs
  5.   Enforced GPOs

When new GPO is applied, it overrides the previous one. So, the last one has highest precedence and first one has least. To make it clearer, I’ll explain it with an example.

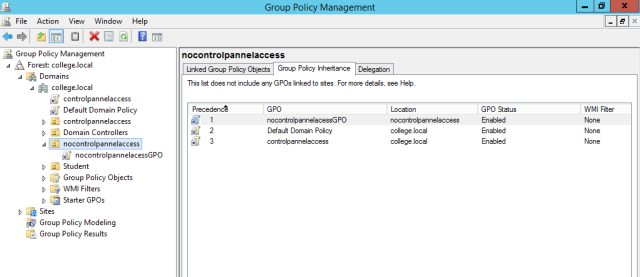
1 . In the picture below, you can see my Group policy management console, where my site is my Forest and my domain is college.local. In my domain, I have one OU as “nocontrolpannelaccess”. and I have linked it to “nocontrolpannelacessGPO”. I have edited nocontrolpannelaccessGPO in such a way that it will prohibit users to access control panel and other GPO “controlpannelaccess” allows users to use control panel.

This GPO for the OU overrides other GPOs linked to Domain (Default Domain Policy and controlpannelaccess). Thus, the users in OU “nocontrolpannelacessGPO” will not be able to access control panel.

gpo1

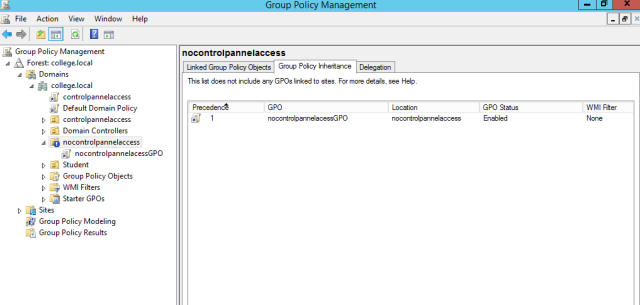
2. If you block inheritance on any OU, then any group policy above this OU doesn’t get applied. As you can see, the container “nocontrolpannelaccess” just has now only one policy on it.

gpo3

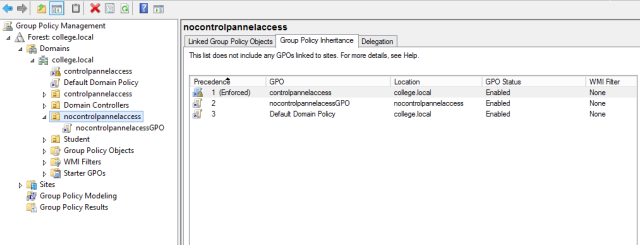
3. If on the other hand, I enforce “controlpannelaccess” policy on domain, then no matter what policy is applied on any OU, enforced policy (controlpannelaccess) will have more precedence. So even users in “nocontrolpannelaccess” OU will now be able to access their control panel.

gpo2

Upgrade Cisco Router IOS via TFTP Server

Upgrading IOS in routers is quite easy. For this, we need to install TFTP server. There are many free TFTP servers available on the internet and you can download one from http://tftpd32.jounin.net/   Before doing the upgrade, make sure that you either have backed up your IOS image or you have a newer one.

  • Okay, now first things first. Disable other networks and set up a static IP address on your computer on which TFTP server is installed. I am giving my computer a static IP address of 192.168.1.1 with subnet mask 255.255.255.0
  • Open your TFTP server, browse it to the folder where your IOS image is kept.

11

  • Now, open your hyper terminal. Before upgrading the IOS, make sure that you have deleted the older one by typing the command:
    Router# delete flash:

delete-flash

It will then ask you for the file name, type  correctly the name of your file. You can look for the file name with command “show version”.

  • Now type in the following commands in rommon mode: (make sure you connected a cable to your g0/0 port of your router.)
IP_ADDRESS=192.168.1.2

IP_SUBNET_MASK=255.255.255.0

DEFAULT_GATEWAY=192.168.1.1

TFTP_SERVER=192.168.1.1

TFTP_FILE=c1841-ipbase-mz.124-3i.bin

Tftpdnld

Type ‘yes’ when it asks if you want to continue and then type reset to restart.

So  you just upgraded your IOS. Enjoy!

Recovery of Corrupt or absent IOS on cisco switch

First, enter rommon mode by unplugging and plugging the power cable back and press the mode button for few seconds. Also, keep in mind to set the BUAD rate as high as possible to speed up the downloading process.

s2

Once you are in rommon mode, type the following commands,

Switch: flash_init

Switch: reset

s2

In enable mode, type command to delete old or corrupt flash (this command is going to take a few moments).

Switch# erase flash:

Switch# reload

s3

You can verify it with  # dir flash:

After you finish booting, you will enter rommon mode as there is no ios. Type,

switch: copy xmodem: flash:c2960-lanbase-mz.122-35.SE5.bin

go to Transfer Tab “Send File…” browse the file on desktop and the protocol is “Xmodem”

s6

This is going to take while. Once you finish this, type:

unset BAUD

s7

Establish a new connection with default setting and reset to restart the switch or simply type switch: boot to load ios. With this, we are done and you can use your switch. 🙂


Add client to Active Directory Domain on Window server 2012

Your domain controller is of no use if you haven’t added machines to it. So here I am going to show simple steps to add client (window server 2008 r2) to window server 2012 domain.

From the AD users and computers of server 2012, right click computers, then go to New|Computer. In the prompt asking for name, give name of your client machine.

jcThen switch to client machine, and make sure in network settings, DNS is pointing to the correct DNS server. In my case, DNS address is same as IP address of server 2012. To make sure, ping your domain from client machine.

Now, in the system settings of window server 2008, click ‘Provide computer name and domain’ and then ‘change’ (Pic. 2).

In a prompt, select domain, and correctly put the name of your domain in space provided and press OK (Pic. 3).

Congratulations! You just connected your client to your domain.

jc2jc3jc1

All about active directory users and computers (Window Server):

As name implies, active directory users and computers is used to manage users, groups, computers, domains, organizational units in Active Directory.  Using this Microsoft Management Console (MMC), you can create new users, reset their passwords, add them to certain groups, grant certain rights, move them, enable or disable them and so on. You can access AD users and computers mmc from tools or by typing “dsa.msc” in run.

ad1

If you expand domain name (college.local) in left pane, you can see different containers like builtin, computers, Domain Controllers etc.Builtin contains the automatically created security groups like Administrators, Backup Operators and

Builtin contains the automatically created security groups like Administrators, Backup Operators and many more that Microsoft creates for our easiness. Brief description of each group is given on the right hand.Computers container is the default containers of all workstations or computer objects in active directory.

Computers container is the default containers of all workstations or computer objects in active directory.Domain Controller contains all domain controllers in active directory domain.

Domain Controller contains all domain controllers in active directory domain.

Forest Security Principals contains the objects that belong to trusted external domains.

Users is default containers for all objects in active directory. Objects can be computers, groups, users, etc.

Create a new OU:

Organisational unit is a container in active directory to which group policies can be applied. To create OU, right click on the domain, then new and select organisational unit. Give a unique name in screen and enter OK.

ad2

ad2

Create a user and add a user to group:

To create a user, right click on OU and then new|user. Follow the prompts to add new user. If you want to add user to a group, then right click the user and select add to a group. In a prompt ‘select groups’, type in the first few words, then click check names. Then select the group you want to the user to be member of. If you are not sure about group name, then click Advanced. Click Find Now to see all the groups.

Note: Ordinary user cannot login into domain controller. The user should be member of ‘domain admins’.

ad3


ad3

There are many other things you can do in AD users and computers like Move a user, create a group, delete a group, reset password, set logon times and so on.

Install Havij in Ubuntu 12.04

Havij is SQL Injection tool and provides us with features for exploiting the SQL vulnerability.By using this software user can perform back-end database fingerprint, retrieve DBMS users and password hashes, dump tables and columns, fetching data from the database, running SQL statements and even accessing the underlying file system and executing commands on the operating system.

Havij runs on windows based operating system. However you can use Wine to get havij in Linux.Here are few steps for installation of havij on your ununtu machine.

Open your terminal and give a command to install wine.

            sudo apt-get install wine

Then, download Havij using command:

          wget http://itsecteam.com/files/havij/Havij1.15Free.rar

You can also download it from http://www.itsecteam.com/products/havij-v116-advanced-sql-injection/index.html.Now, Untar the file using:

           unrar x Havij1.15Free.rar

Right click on the Havij .exe file and Choose Open with Wine Windows Program Loader and install it.

Havij

Screenshot from 2014-03-03 11:45:37

hh

Free version of Havij is limited in some features, one can purchase the commerical version at http://itsecteam.com